Showing posts with label DIY. Show all posts

Tuesday, March 12, 2013

Lets go on Safar... Devin turns 10

Well another year has passed and we have had another big birthday bash!! When I sat the kids down and said OK its party planning time what themes do you want Devin was up first! He said something with animals so we did a safari! Devin is my step son in case you didn't know and so we decided to combine parties with his mom and her family to make it extra special this year! It was a HUGE success and we had a huge turn out! Lets jump right in shall we?
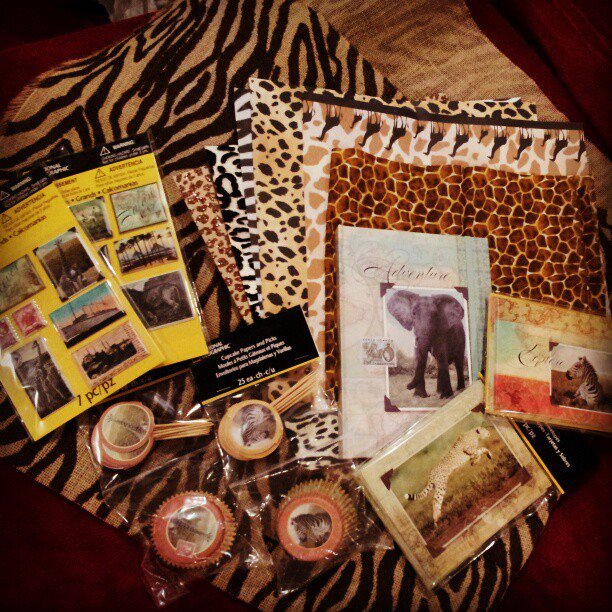
I am all about cheap, crafty, DIY , and trash to treasures! so I took a trip with little money to Michael's,  and Joann's and found this lot of goodies for little $$ in fact most of this was in the dollar section and it was 40% off... yeah God coordinates with Michael's for me when I have parties.. it never fails their dollar bins have my theme... can you believe they had Nat Geo animal stuff!! (cupcake liners.. yes I know!) My mom spotted the zebra burlap at Joann's and I was off to a great start!
Welcome to the safari... of course we start with the front door :)
So this is the most last minute, easiest wreath ever, your not going to believe me but its literally just coffee filters wrapped around a hay wreath then a bunting i had left over from his cake bunting and a card that was in the pack of cards I bought at Michael's in the dollar section. I had not planned on even doing a wreath but had the stuff laying around so I put it together in literally five minutes.
I have this pallet on my porch and as the seasons change I add buntings and decor to give some life to the porch so I just clothes pinned the cards (out of the stack from Michael's dollar bin ) to twine.
One thing Veronica and I (Devin's mom) had trouble with from the get go was finding a location... Since Devin is a March baby the weather does not always cooperate, hot or cold?? We just couldn't bank on either... So we needed in doors after searching and searching and searching.... we finally had to land at our house BC everyone else had the same idea as we did for march parties. With us combining parties we were looking at anywhere from 50-80 people.. um I have a 1500 square foot house y'all.. how will this work... So I took out my couches and coffee table and big chair and put them on the porch and set up three tables just like this for the kiddos.

I wanted something that cost me little money but was safari themed as a center piece.. I have collected coke bottles and have them on shelves in my kitchen for some time so i thought i want buntings , cause I LOVE THEM so I wrapped canvas around them, twine ropes and made little buntings.. it actually cost me no money although it took some time it was very simple.
 

and the adults come to our little section over here for their tableware. I LOVE my old ladder, I change this out with decor as the seasons change as well :) it works great for party decor.
now on to the main table.....
the bunting.. one of my favorite things and a must at every party!! It was literally pics i found online, printed them off attached them to twine and a coffee filter with a clothes pin and then cut up that PERRRTY zebra burlap we found at Joann's! WALLA!
enough with the bunting, lets talk about the goodies on the table... remember those fun little cupcake liners! well here they are! Cute little cupcakes or "snake cakes" as I named them... 


 Jungle juice aka lemonade
aren't you just loving all these cute little labels?? I found them for free at pottery barn!! here is the link if you wanna throw a safari party of your own they have a whole kit!!
duct tape and water bottles equals winning.
Safari cake, with a new baby around I didn't want to do a bunch of fondant and time consuming hard cake, so I started searching pinterest and found one similar to this and just knew it was perfect! I added crushed vanilla wafers instead of peanuts like the other cake and I added a little green twine hay stuff (not sure what its called but its at Joann's for two bucks!!)
safari party favors! Bubbles I found online for super cheap and peeled the labels off and wrapped card stock and twine around them, snakes , tattoos, stickers, and safari coins!
stored the favors in this super cute bird cage of my moms! Its march so the Easter stuff is everywhere so I bought a bag of 35cent Easter grass :)
set up a little station of safari bug tattoos for the kiddos with my baby wipes (we have a four month old so I had bought these for around the house to put on the coffee table some time ago and thought hey that would be perfect for the kids to put tattoos on with so I don't have to mess with water or cold rags!! ) wrapped in canvas twine and duct tape :)
Jungle Face Painting!!
Kaitlyn and Parker! (Parker refused to smile after he got his face painted like a tiger.. he was in character!)
is Bradyn not just adorable??!
and the main event!! we had the zoo bring out and animal and the birthday boy picked a hyacinth macaw. Her name is Glory and she was a blast to watch and learn about!
all the kids were a little intimidated by her!
 
She was a hoot :)
I hope you enjoyed our Safari party I know the Birthday boy did!
Happy 10th Birthday Devin!!
Thursday, February 14, 2013

A bridal shower... lets catch up here!

Its been forever since I have posted! Rightly  so as I have only had ONE MILLION things going on.
I am going back several months to projects and parties that I did over 2012 that didn't get posted BC life was the craziest its ever been, EVER! I am going to start off with one of the smaller of get togethers and that is my sisters bridal shower. It was a very small , sweet and simple get together .
First meet the bride and groom (now the happily married couple) Mr. and Mrs. Matt Ford


They are just too sweet for words... so lets move on to celebrate the bride at her bash :)
it was super simple to set up and I spent hardly anything at all.. the paper chains hanging down on either side is wrapping paper from the dollar store cut into strips with coffee filters made into flowers randomly hanging on the chains. the sign was a piece of barn wood I had lying around and I wrote on it with chalk , which can easily be wiped off and erased! I then just printed off their engagement pics (done by yours truly) and hung then on twine, printed a few things off the computer and put it on my awesome barn wood table!!
found these printables on a template on pinterest and found these cute cupcake liners at Michale's for $1
I made the cake and it was super simple, just cake on the frosting get a small paint brush and start making swirls :)
there you have it! a simple but sweet and effective bridal shower set up!
I am posting below a couple pictures of her wedding cake that I made
and there it is my two cents on my sisters new found marriage :) hope you enjoyed!

Saturday, June 2, 2012

Kid car wash sprinkler DIY

I saw this idea on pinterest here and fell in love. I decided I wanted to do it for my sons third birthday party and we did. However I had my husband get it up and running weeks before the party for our kiddos to play in becuase it was just too cool!!
The DIY kiddy car wash!
this is our version of the car wash at Parker Party
and more pics of it in action before the party and at the party.
 I mean really what is the point of a car wash with a clean car??!!
Hope you enjoy our version of the car wash. The kids seriously love this thing. Ours ended up costing us about 40$ it says on the site its only about 30$
what I did different:
  • spray painted it (my hubbys idea!!)
  • used plastic table cloths cut into sections as the end colorful "thingys" what are those called anyway
  • I got cheap sponges and different ones ALL from different dollar stores . I read alot of people spent their money on the sponges mine were $1 a peice no more.
  • Added a road! I mean come on how much cuter. We did this two ways. 1st way we tried with the black garden fabric it worked great kept the kids feet from hurting on the mulch or grass and kept them from being too hot... BUT it sank the wetter it got the more mushy (we did have it on mulch so that may not happen on grass) 2nd way and what we stuck with was black plastic from lowes. This isnt cheap but we used it for 3 other projects so 9$ broken down into 3 projects with extra left over is not bad! for the stripes we used yellow duct tape.
  • we added flags to ours.
  • we did not use the stop and go arm , no point when running through!

and there you have it!! if you missed the link at the top on how to make this you can find it here
ENJOY!! my kids are!

DIY HUGE picture!

Ok So you saw on the Harry Potter Birthday I did the HUGE picture of my step son.
and now with my sons Dr. Seuss Party another HUGE picture and some big pics like 8x10 on a whole page made into photbooth props.

and everyone keeps asking how in the world did you do that. This was 5$ and I'm not kidding...
the tutorial on how to do this is here
The only thing I will add is she mentions you can get these at any office store. YOU CANNOT. I have tried. STAPLES is where you will need to go. If you are local then I suggest going to Murfreesboro over Smyrna. The machine in Murfreesboro is slightly bigger and you can get the print bigger. Another detail I will add you cannot spray paint the foam (some of you may be saying DUH but I learned from experience this didn't work)
Also she said she duct taped hooks onto the back to hang it I had no issue with this method at Devin's party but at Parker's I did and they were the same size. I ended up having to saturate each section of ribbon I was using as "a hook" with hot glue and let it completely dry. On both of these I was not using them for home decor (altho I may now) so I just did it quickly and not to perfection. I am sure there are lots of other methods of making a hook for the back.
Hope you enjoy.. I have one more to make for Kaitlyn's party and then I will do 4 brand new ones to hang in my home once our new baby is here and I have updated pics of all the kids.
I was amazed by this and glad to share!


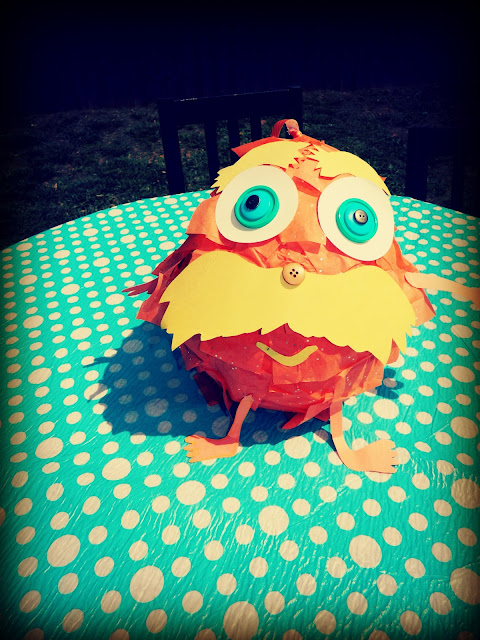
DIY Lorax Pinata

Ok I had to share the Lorax pinata tuturial. I am actually going to post the directions to the tutorial I used and then just tell you how I changed and tweaked it to work for me.
Here is my Lorax
Here is the tutorial  I found On pinterest on how you can make your own

What I did differently:
I used a button nose. Button eyes. I liked the character it added to Lorax. My tissue paper was glittery it was the only orange tissue paper I could find.. I think it worked well cause Seuss is always whimsical. I made my a normal sized pinata... well kind of Its not near as small as the one calls for in the directions. I had enough candy for everyone of the kids who participated to get some to take home. Warning... This is not as easy as the directions make it out to be... It was not completely clear to me on all things. I suggest drying each layer of newspaper before continuing on with  a second layer, however its very difficult in a circle to tell where your first and second and third layers end and begin so I just covered it as well and thick as I could. With painting I used CHEAP paint that was waterproof and kid friendly. I only used one coat because you are covering it in orange tissue paper so no need to go painting it all crazy. Have fun make it your own and good luck!
here are some of the good ole Lorax in action